When it comes to protecting our belongings in outdoor storage sheds, we often overlook the basics. We think a simple lock is enough, but thieves can be pretty clever. We’ve put together some straightforward tips to make your shed a much harder target. Let’s get your shed secured.
Key Takeaways
- Securing the entry points of your outdoor storage sheds with strong padlocks and reinforced doors is a primary defense against break-ins.
- Visible deterrents like motion-activated lights and gravel pathways can discourage potential intruders from approaching your shed.
- Adding a shed anchor and performing regular maintenance on both the shed structure and its security features are important for long-term protection.
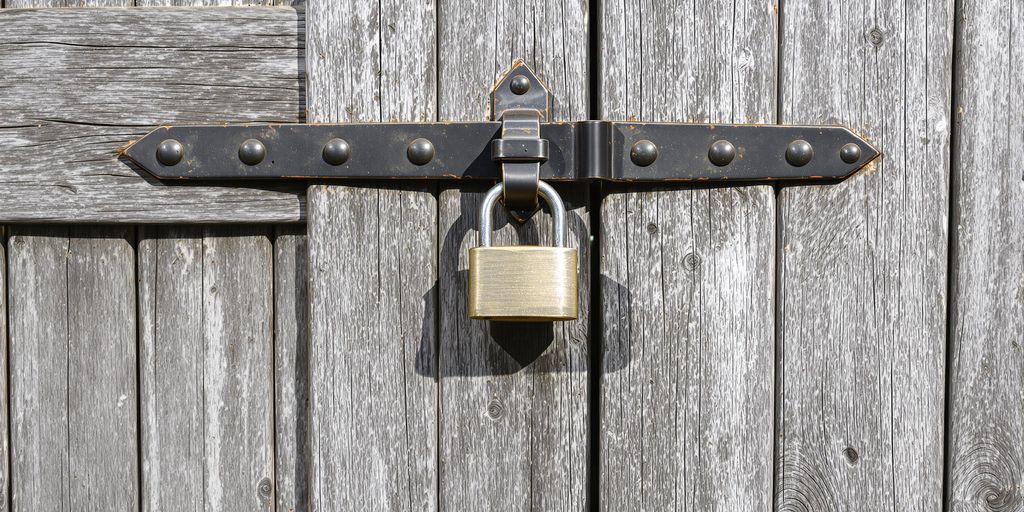
1. Padlock

When we talk about securing your shed, the padlock is your first line of defense. It might seem obvious, but picking the right one makes a big difference. We want something sturdy, something that looks like a hassle to break.
Choosing the Right Padlock
We should look for padlocks made from hardened steel. This material is tough and resists cutting. The shackle, the U-shaped part that goes through the hasp, should also be thick and hardened. A boron carbide shackle is even better if you can find it, as it’s incredibly hard. We also need to consider the locking mechanism. A disc detainer lock is generally more pick-resistant than a pin tumbler lock.
Padlock Types and Ratings
- Weather Resistance: If your shed is outdoors, you’ll need a padlock that can handle the elements. Look for models with rust-resistant coatings or brass components.
- Security Ratings: Some manufacturers provide security ratings. Higher numbers usually mean better resistance to picking, prying, and cutting.
- Shackle Type: Closed-shackle padlocks, where the shackle is mostly enclosed by the body, are harder to attack with bolt cutters. Open-shackle ones are easier to use but more exposed.
Proper Padlock Usage
It’s not just about the padlock; it’s about how you use it. Make sure the padlock fits snugly through your hasp and that there’s no excessive play. A padlock that dangles loosely can be easier to attack. We also want to make sure the keyway isn’t exposed to the elements if possible, as dirt and moisture can affect its performance over time. We’ve found that a good quality, weather-resistant padlock, used correctly, can deter many opportunistic thieves.
Key Management
Don’t hide spare keys near the shed. Thieves know all the common hiding spots. If you must have a spare, keep it in a secure location inside your home or give it to a trusted neighbor. We also recommend changing the padlock if you lose a key or if someone unauthorized might have had access to it.
2. Hasps
When we talk about securing your shed, the hasp is a really important piece of hardware. It’s that metal strap that swings over your padlock, keeping it in place. A weak hasp can be a weak point, no matter how good your padlock is. We need to pick hasps that are built tough.
Types of Hasps
There are a few main kinds we see:
- Strap Hasps: These are the most common. They have a long strap that attaches to the shed door and a plate that attaches to the frame. The strap then loops through the padlock shackle.
- U-Shaped Hasps: These often have a U-shaped piece that goes through a hole in the door and frame, with the padlock securing the two ends together. They can offer a bit more resistance to prying.
- Heavy-Duty Hasps: These are generally thicker, made from stronger metal, and might have larger mounting plates and screw holes. They’re designed to withstand more force.
Material Matters
We should look for hasps made from solid steel, preferably galvanized or stainless steel. This helps prevent rust, which can weaken the metal over time. Avoid thin, flimsy materials that bend easily. A good hasp should feel substantial in your hand.
Installation Tips
Proper installation is key. We need to use the right kind of screws.
- Use security screws or one-way screws if possible. These are harder for thieves to remove if they try to tamper with the hasp itself.
- Make sure the screws are long enough to go deep into the shed’s framing, not just the thin siding.
- Mount the hasp so that the padlock is protected from bolt cutters as much as possible. Sometimes, positioning it slightly inward or using a hasp with a built-in shroud can help.
A poorly installed hasp, even if it’s made of strong material, can be easily defeated. Take the time to do it right.
3. Door Reinforcement
Our shed doors are often the weakest point when it comes to security. A determined thief might not bother with a padlock if the door itself is flimsy. We need to think about making that door a much tougher target.
Hinges
We should check the hinges on our shed doors. Are they on the outside where someone could just unscrew them? If so, we need to fix that. We can replace them with security hinges that have non-removable pins, or we can install them so the pins are on the inside. Another option is to use security studs or bolts that go through the door and frame, making it impossible to remove the hinge pins from the outside.
Deadbolts and Reinforcement Plates
Adding a deadbolt is a good idea, but we also need to consider the door frame. A strong deadbolt is only as good as the wood it’s going into. We can reinforce the door frame with metal plates, especially around the lock area. This makes it much harder to kick in or pry open. Think about using longer screws for the strike plate, driving them into the wall studs rather than just the door frame itself.
Door Material
If our shed door is made of thin plywood or a similar weak material, it’s a prime candidate for an upgrade. We could consider replacing it with a solid wood door or even a metal door if the shed’s structure can support it. At the very least, we can add a layer of metal sheeting to the outside of the existing door to make it more resistant to forced entry. A reinforced door is a significant deterrent.
4. Window Bars
Windows can be a weak point for shed security. While they let in light, they also offer an easy way for someone to peek inside or even break through. Adding window bars is a straightforward way to make your shed much more secure.
Types of Window Bars
We can install bars made from different materials, each with its own pros and cons. Steel bars are very strong and durable, offering excellent protection. Aluminum bars are lighter and resist rust, which can be good if your shed is in a damp area. Some bars are decorative, while others are purely functional.
Installation Considerations
When putting up window bars, we need to think about how they’re attached. They should be bolted securely from the inside, if possible. This means someone can’t just unscrew them from the outside. We also want to make sure the bars are spaced correctly – close enough to stop someone from reaching through or breaking the glass easily, but not so close that they block too much light or look too imposing.
Maintenance
Even strong window bars need a little care. We should check them periodically to make sure they haven’t loosened up or started to rust, especially if they’re made of iron or steel. A quick coat of paint every few years can keep them looking good and protected from the weather.
Securing your shed windows with bars is a practical step that significantly increases its resistance to break-ins. It’s a visible deterrent that tells potential intruders this shed isn’t an easy target.
5. Motion-Activated Lights
Illuminating your shed’s exterior is a smart move for security. Motion-activated lights are a great way to deter potential intruders. When someone approaches your shed, especially at night, these lights suddenly switch on, startling them and drawing attention to the area. This immediate illumination can make a would-be thief think twice. We find that placing these lights strategically around the shed’s perimeter is most effective. Consider covering all sides, particularly the door and any windows.
Placement Strategy
- Front Entrance: Position a light directly above or beside the main door. This provides immediate visibility when someone approaches.
- Side Walls: Install lights on the side walls, especially if there’s a pathway or open space leading to them.
- Rear Access: Don’t forget the back of the shed. If there’s access from the rear, a light here is just as important.
Brightness and Coverage
When selecting lights, think about the lumen output. For most sheds, a brightness between 700 and 1500 lumens is usually sufficient. You’ll also want to check the detection range and angle of the motion sensor. A wider angle and longer range mean fewer blind spots.
Power Source Considerations
We’ve seen a few options work well:
- Solar-Powered: These are easy to install as they don’t require wiring. They charge during the day and power the light at night. Their effectiveness can depend on sunlight availability.
- Wired: If you have access to an outdoor power outlet, wired lights offer consistent power and brightness, regardless of weather.
- Battery-Operated: A simpler option for areas without easy access to power or sunlight, though batteries will need regular replacement.
A well-placed motion light can be one of the simplest yet most effective deterrents we use.
6. Security Cameras
Adding security cameras to your shed is a smart move. We find that visible cameras can really make potential thieves think twice. It’s not just about catching someone after the fact; it’s about deterring them in the first place.
Camera Types
We’ve looked at a few different kinds:
- Wired Cameras: These usually give a more stable connection and don’t need frequent battery changes. However, running the wires can be a bit of a hassle, especially if your shed is far from a power source.
- Wireless Cameras: These are much easier to set up, often just needing a Wi-Fi signal. Battery life can be a concern, and sometimes the signal can be spotty.
- Solar-Powered Cameras: A good option if your shed gets plenty of sun. They’re eco-friendly and reduce the need for battery swaps, but performance can dip on cloudy days.
Placement Strategy
Where you put your cameras matters a lot. We generally recommend covering the main entry points and any vulnerable sides of the shed. Think about the angles – you want to avoid blind spots.
A good rule of thumb is to place cameras where they are visible but also protected from the elements. Mounting them under an overhang can help keep them dry and extend their lifespan.
Recording and Storage
Consider how you want to store your footage. Options include local storage (like an SD card in the camera) or cloud storage. Cloud storage is convenient for remote access, but it usually comes with a monthly fee. Local storage means you have the footage right there, but you need to remember to check it or have a system that overwrites old footage automatically. We’ve found that a mix can be good – local for immediate access and cloud for backup.
Motion Detection
Most modern cameras have motion detection. This is great because it only records when there’s activity, saving storage space and battery life. You can usually adjust the sensitivity, which is helpful to avoid false alarms from passing animals or blowing leaves. Setting it up right takes a little trial and error, but it’s worth it.
7. Alarm System
Adding an alarm system to your shed is a smart move for keeping your tools and belongings safe. We’ve found that even a basic system can make a big difference.
Types of Shed Alarms
There are a few main kinds of alarms you can get for your shed:
- DIY Wireless Systems: These are usually the easiest to set up. They often come with door/window sensors and a main control panel. You can often expand them with more sensors later.
- Wired Systems: These are more permanent and generally considered more reliable, but they require more work to install. You’ll need to run wires for sensors and the main unit.
- Standalone Alarms: These are simple, often battery-powered units that make a loud noise when triggered. They’re not connected to anything else but can scare off intruders.
Key Features to Consider
When picking an alarm, think about what you need:
- Sensors: Door/window sensors are standard. Motion detectors can cover larger areas inside the shed.
- Notifications: Do you want the alarm to just sound locally, or do you want it to send alerts to your phone? Some systems can text or call you.
- Power Source: Battery-powered is convenient, but you’ll need to remember to change batteries. Mains-powered systems are more consistent but need a power source nearby.
- Ease of Installation: If you’re not very handy, a wireless DIY system is probably your best bet.
A loud siren is often enough to deter someone who wasn’t expecting it. We also like systems that let us know if the power goes out or if a battery is low, so we’re never caught off guard. It’s a good idea to test your alarm regularly, maybe once a month, just to make sure everything is still working as it should.
Setting up an alarm might seem like a hassle, but it’s really about peace of mind. Knowing that your valuable equipment is protected gives you one less thing to worry about, especially if you store expensive tools or seasonal items in your shed.
8. Gravel Pathways
We often overlook the simple things when securing our sheds, but the approach to your shed can be a surprisingly effective deterrent. Consider installing gravel pathways leading to your shed doors. The crunching sound of gravel underfoot is an immediate alert that someone is approaching, giving you or neighbors a chance to investigate. It’s a low-tech, yet effective, way to add a layer of security.
Here’s why gravel pathways work:
- Audible Alert: The noise generated by walking on gravel is hard to ignore. It acts as an early warning system.
- Discourages Stealth: It makes it much harder for someone to approach your shed unnoticed, especially at night.
- Deters Pests: Some animals dislike walking on gravel, which can help keep your shed area clearer.
- Improves Drainage: Gravel allows water to drain away from the shed foundation, preventing moisture buildup.
We recommend a gravel depth of at least 3-4 inches for optimal sound and deterrence. The type of gravel also matters; smaller, sharper stones tend to make more noise than larger, rounded ones. Think about the main entry points and any windows that might be accessible. Covering these areas with a good layer of gravel can make a significant difference.
While not a foolproof method, a well-maintained gravel path around your shed adds a noticeable layer of security by making stealthy approaches difficult and noisy. It’s a practical step that complements other security measures.
9. Shed Anchor
Securing your shed to the ground is a really good idea, especially if you have valuable items inside or if your shed is in an area prone to strong winds. We’ve found that a shed anchor can make a big difference. It’s not just about stopping someone from easily tipping the shed over; it also helps keep it stable during storms.
There are a few ways to anchor your shed:
- Concrete Anchors: These involve pouring concrete footings and embedding anchor bolts into the wet concrete. Once the concrete cures, the shed’s base can be bolted to these.
- Ground Anchors (Augers): Similar to how you might anchor a tent, these screw-like anchors are driven deep into the ground. Cables or straps then connect the shed’s base to these anchors.
- Skid Foundation Anchors: If your shed sits on treated lumber skids, you can use specialized brackets that attach to the skids and then anchor into the ground or a concrete pad.
We recommend checking the manufacturer’s instructions for your specific shed model, as they often have recommended anchoring methods. A properly anchored shed is much harder to steal or damage. It’s a simple step that adds a significant layer of security and stability.
Anchoring your shed might seem like extra work, but it’s a smart move. Think of it like putting a lock on your shed door – it’s a deterrent and a physical barrier. We’ve seen sheds get damaged or even blown over in severe weather, and anchoring is the best way to prevent that.
10. Regular Maintenance
We often focus on the big security upgrades, but we shouldn’t forget about keeping things in good working order. Regular maintenance is key to making sure all those security measures we’ve put in place actually work when we need them to. It’s like changing the oil in your car; you don’t think about it until something goes wrong, but it keeps everything running smoothly.
Check Your Padlocks and Hasps
We need to periodically inspect our padlocks and hasps for any signs of wear or damage. Look for rust, especially on the shackle of the padlock, which can make it stiff or even break. Make sure the hasp is still firmly attached to the shed door and frame. Loose screws or bolts are an invitation for trouble. If you see any rust, a little bit of lubricant can go a long way. We should also test the locking mechanism to ensure it operates smoothly.
Inspect Door and Window Reinforcements
Our door hinges, locks, and any added reinforcement plates can loosen over time with use and weather exposure. We should give them a good once-over, checking that all screws and bolts are tight. If we’ve added metal plates or bars to the door or windows, we need to make sure they haven’t warped or become detached. A quick wiggle test can tell us if anything is loose.
Test Your Lighting and Alarm Systems
If we have motion-activated lights, we should test them regularly to confirm they still turn on when they should. Batteries might need replacing, or the sensors could get dirty. For any alarm systems, we need to test the sensors and the siren periodically. We should also check the battery backup if our system has one. It’s a good idea to have a schedule for this, maybe once every few months.
Maintain Gravel Pathways
While gravel pathways are great for deterring quiet approaches, they can get washed away or compacted over time. We should check that the gravel is still spread evenly around the shed, especially near doors and windows. If we notice bare spots or areas where the gravel has thinned out, we should top them up. This keeps the noise deterrent effective and also helps with drainage.
Secure Your Shed Anchor
If we’ve anchored our shed, we need to check that the anchor points are still secure. Whether it’s concrete anchors, ground stakes, or straps, we should ensure they haven’t come loose due to ground shifting or corrosion. Give the anchor points a tug to make sure they’re still firmly in place.
Neglecting simple upkeep can undo the benefits of even the most robust security measures. A little bit of attention now can prevent a much bigger problem later on. We want our shed to be a safe place for our belongings, and that means keeping our defenses in good shape.
General Upkeep
Beyond the specific security items, we should also do general checks. Look for any signs of wood rot or damage to the shed structure itself, as this can compromise its integrity. Make sure the door still closes properly and that there are no gaps that could be exploited. Keeping the shed clean and organized also makes it easier to spot any potential issues early on.
Wrapping Up Shed Security and Safety
So, we’ve gone over a few things to keep your shed safe and sound. It’s not too complicated, really. Just a few smart steps can make a big difference in stopping unwanted visitors or accidents. Think about adding a good lock, maybe some lighting if it’s dark around there, and keeping things tidy inside. We want our sheds to be places for our tools and gear, not a problem. By taking these simple measures, we can all feel a bit more secure about what’s stored away. It’s about peace of mind, you know?
Frequently Asked Questions
What kind of lock should we use for our shed?
We suggest using a strong, weather-resistant padlock, ideally a disc lock or a heavy-duty shackle lock. These are harder for thieves to break. We also recommend checking the lock’s rating; higher ratings mean better security.
Are window bars really necessary for shed security?
Yes, adding bars or grates to shed windows is a smart move. It makes it much harder for someone to break in and reach through to unlock the door or grab items. We find that metal bars are quite effective.
How does regular maintenance help keep our shed safe?
We believe that keeping your shed in good shape is key to its safety. This means checking for any loose boards, making sure doors and locks work smoothly, and clearing away any clutter around the shed that could hide someone. Regular checks help us spot problems early.
Tags: Affordable Sheds, Long Lasting Sheds, Residential Shed Builder